
What Is Sublimation in Printing? A Complete Guide for Apparel Brands
Sublimation printing is a heat-based method that turns solid dye into gas and bonds it with polyester fabric at the fiber level. The design doesn’t sit on top of the garment, it becomes part of the material itself.
That one detail changes everything. It’s why sportswear companies, uniform suppliers, and merch brands trust this method for orders that have to survive hundreds of washes without cracking or fading. Below, we break down how the process works, the gear it needs, what it can (and can’t) print, and when buying in bulk beats doing it yourself.
How the Sublimation Process Actually Works
The name comes from chemistry. Sublimation is the change from a solid state directly into gas, no liquid stage in between. Dry ice does it on your countertop; sublimation dye does it inside a heat press at around 375–400°F.
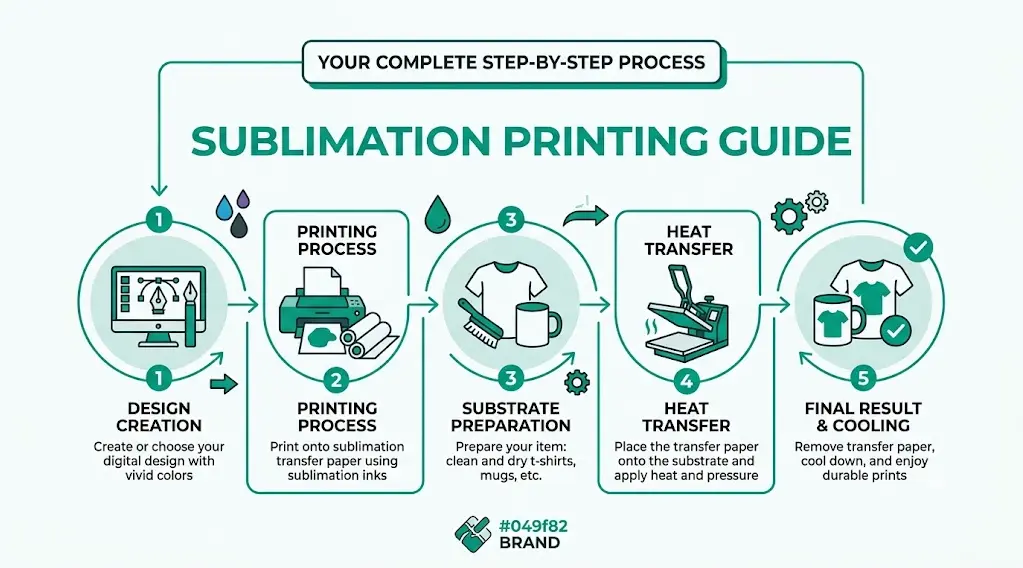
Here’s the full workflow from screen to shirt:
- Print: your design is printed in mirror image onto special transfer paper using dye-based inks.
- Press: the paper goes face-down on the fabric inside a heat press at roughly 400°F for 45–60 seconds.
- Transfer: the heat vaporizes the dye while the polyester’s pores open, letting the gas flow into the fibers.
- Lock: as the fabric cools, the pores close and trap the color permanently inside the material.
A quick authenticity test: run your finger across the design. If you can feel any texture at all, it isn’t dye-sub, a true sublimated print leaves the fabric completely smooth.
One catch worth knowing early: the dyes are translucent, and there’s no white ink in the CMYK dye set. That’s why this method only works on white or light-colored synthetic fabric, the base color always shows through.
Why Polyester Is Non-Negotiable
Polyester is a thermoplastic. Heat it past roughly 380°F and its molecular structure loosens just enough for gas molecules to slip between the polymer chains. When it cools, the structure tightens again and the dye is locked in, chemically, not mechanically.
Cotton has no such behavior. Its fibers can’t open and trap the gas, so any color that lands on them washes out within a few cycles. Blends split the difference: a 65/35 poly-cotton shirt keeps about two-thirds of the dye, which is why blends produce that softer, vintage-faded look many brands actually want.
What Do You Need for Sublimation Printing?
The starter kit is short, but every piece is specialized. Regular inkjet supplies won’t work.
- A dye-sub printer: Epson SureColor and Sawgrass are the industry standards. Entry models run $400–$1,500.
- Sublimation inks: dye-based, not pigment. A full set costs $20–$80 depending on the printer.
- Transfer paper: coated sheets that release the dye cleanly under heat.
- A heat press: clamshell presses start near $150; swing-away and large-format models climb past $2,000.
- Polyester blanks: at least 65% polyester for solid color retention; 100% poly for the brightest, longest-lasting result.
Plan for workspace, too. A press needs a sturdy table, clearance for the swing or clamshell arm, and decent ventilation, pressing polyester at 400°F releases fumes you don’t want in a closed room all day.
Time, temperature, and pressure decide whether the print pops or ghosts. These settings cover the most common apparel jobs:
| Fabric / product | Temperature | Time | Pressure |
| 100% polyester shirts | 385–400°F | 45–60 sec | Medium |
| 65/35 poly-cotton blends | around 385°F | 40–45 sec | Light–medium |
| Polyester hoodies / fleece | 385–400°F | 50–60 sec | Medium |
Pro tip: pre-press every garment for 3–5 seconds first. It drives out moisture and wrinkles — the two most common causes of blurry, faded transfers.
What Does a Sublimation Printer Do?
It’s an inkjet at heart, but built for a different job. Instead of spraying pigment that dries on the surface, it lays down heat-reactive dye onto transfer paper, in reverse, so the design reads correctly after pressing.
Can a regular printer do it? Almost never. Most household printers from HP or Canon use thermal print heads that cook the dye inside the machine. Epson’s piezo-head models are the exception, which is why converted EcoTanks are so popular with beginners.
Color management matters more here than in normal printing. Dye colors shift under heat, so professionals rely on ICC profiles to make sure the muddy preview on paper turns into accurate color on fabric.
Converted vs Purpose-Built: Which Printer Route to Take
A converted Epson EcoTank is the budget path, around $200–$400 with third-party dye inks. It works, but you give up warranty coverage and factory color profiles, and you’ll spend evenings calibrating.
Purpose-built machines from Sawgrass or Epson’s SureColor F-series cost more upfront yet come with dedicated profiles, support, and consistent output. If clients are paying you for color accuracy, that consistency pays for itself within a few misprint-free months.
What Can You Make With a Sublimation Printer?
Anything polyester or poly-coated is fair game. For apparel businesses, the list starts here:
- Performance apparel, jerseys, activewear, leggings, and team uniforms with numbers and gradients baked in.
- All-over-print (AOP) fashion, tees, hoodies, and dresses printed seam to seam.
- Small apparel items, socks, scarves, headbands, and bucket hats.
- Home and promo textiles ,flags, pillow covers, blankets, and banners.
- Poly-coated hard goods, mugs, mouse pads, coasters, and phone cases.
Two things unlock even more products: polymer coating and polyester content. A ceramic mug takes dye because of its poly coating; a tote bag takes it because of its poly fabric. If an item has neither, no amount of heat will make the design stick.
Sublimation in Crafting vs Commercial Production
Crafters typically run a converted desktop Epson and a small clamshell press, perfect for tumblers, gifts, and one-off shirts sold on Etsy. The craft market is where most people first meet this technique, usually alongside a Cricut.
Commercial production is a different machine, literally: wide-format printers, calendar presses for rolls of fabric, and cut-and-sew lines that print the fabric panels before the garment is even assembled. That’s how all-over-print apparel is made at scale.
The quality gap between the two isn’t the chemistry, it’s consistency. A commercial line holds identical color across 500 jerseys; a desktop setup struggles to hold it across ten.
Strengths and Limits of the Method
No printing method wins everywhere. Here’s the honest scorecard.
Where it shines:
- Prints never crack, peel, or flake, the color is inside the fiber, not sitting on it.
- Unlimited colors and photographic detail at no extra cost per color.
- Zero hand-feel; the fabric stays as soft and breathable as it was blank.
- Edge-to-edge, all-over coverage that no vinyl or screen method can match.
- Water-based dyes and minimal waste make it one of the cleaner methods environmentally.
Where it hits a wall:
- Polyester only, on cotton, the dye simply washes out.
- Light-colored blanks only; there’s no white dye to print on black.
- White creasing can appear on AOP garments where folds block the transfer.
- Equipment costs money upfront, and beginner error rates are real.
How It Compares With Other Decoration Methods
Buyers rarely choose in a vacuum, the real question is usually “this or screen printing?” or “this or DTF?”. Here’s the short version; we cover each match-up in depth in separate guides.
| Method | Fabrics | Durability | Feel | Best for |
| Dye-sub | Light polyester | Life of garment | None | Sportswear, AOP, bulk polyester |
| Screen printing | Cotton, most fabrics | High, cracks eventually | Slight layer | Simple logos, big cotton runs |
| DTF | Any fabric, any color | 50–60 washes | Thin film | Dark cotton, small runs |
| Heat transfer vinyl | Most fabrics | Peels over time | Heavy layer | Names, numbers, one-offs |
The pattern is consistent: surface methods trade durability for fabric freedom. Dye-sub gives up fabric freedom and gets permanence in return. Match the method to the garment, not the other way round.
One practical consequence for buyers: a supplier who only offers one method will always recommend that method. Work with someone who runs several, and ask them to justify the choice for your specific fabric and order size.
Five Beginner Mistakes That Ruin Prints
If you do go the DIY route, these five errors cause the vast majority of wasted blanks:
- Skipping the pre-press. Moisture in the fabric turns to steam and blows out fine detail.
- Ghosting. The paper shifts when the press opens, leaving a blurred double image. Heat-resistant tape fixes it for pennies.
- Wrong blank. Below 65% polyester, colors come out washed-out and keep fading with every laundry cycle.
- Over-pressing. Too much time or heat scorches polyester and yellows white fabric permanently.
- Ignoring color profiles. Without the right ICC profile, what prints is not what you designed, usually darker and greener.
Print It Yourself or Order in Bulk? The Real Math
A workable home setup, printer, inks, paper, press, and a stack of blanks,, lands between $600 and $2,500 before your first sellable shirt. Then add the hidden line items: your hours per unit, misprints while you learn, and color drift between batches.
Our rule of thumb after years of running these numbers with clients:
- DIY makes sense for prototyping, one-offs, and runs under about 20 pieces where turnaround is relaxed.
- Bulk ordering wins for team kits, event merch, and resale lines, anywhere you need consistent color across 50 shirts and a firm deadline.
Here’s an illustrative comparison for a full-color polyester tee, assuming a $1,200 starter setup, $9 blanks, and 15 minutes of hands-on labor per shirt:
| Order size | Realistic DIY cost/shirt* | Typical wholesale cost/shirt |
| 20 pieces | $75+ (equipment barely amortized) | $14–18 |
| 100 pieces | $24–28 | $10–14 |
| 500 pieces | $15–18 | $7–11 |
*Includes equipment amortization, blanks, consumables, labor at $15/hr, and a beginner-typical 10% misprint rate. Your numbers will vary, run them before deciding.
Before you buy equipment: get a wholesale quote for your exact design and quantity, then compare it against your true DIY cost per shirt, including labor and spoilage. For most bulk apparel orders, the quote wins by a wide margin.
Conclusion
Sublimation fuses gaseous dye into polyester, producing vibrant prints that never crack, peel, or fade. It demands light-colored synthetic fabric and specialized equipment, but for durable, wash-proof custom apparel at any volume, no other decoration method really competes.
FAQs
Does sublimation work on cotton or dark shirts?
No. The dye only bonds with polyester, and because it’s translucent, dark fabric swallows the design. For dark cotton garments, DTF printing is the better tool.
How long does a sublimated print last?
Effectively the life of the garment. Since the color lives inside the fibers, it survives industrial washing, stretching, and daily wear without peeling, something no surface-level print can claim.
Is the equipment expensive to start with?
A realistic starter budget is $600–$2,500. If that’s more than your project justifies, ordering finished garments in bulk gets you the same print quality with zero hardware risk.
Is sublimation the same as heat transfer vinyl?
No. Vinyl is a cut layer glued onto the surface, which you can feel and which eventually peels. Dye-sub changes the fabric’s color itself and leaves no layer behind.
Can I order sublimated apparel without owning any equipment?
Yes, and for most businesses that’s the smarter route. Wholesale apparel suppliers run commercial dye-sub lines and quote per unit, so you get production-grade color consistency without touching a press.